How do you adjust the Handlebars on an Electric Scooter?
Feature
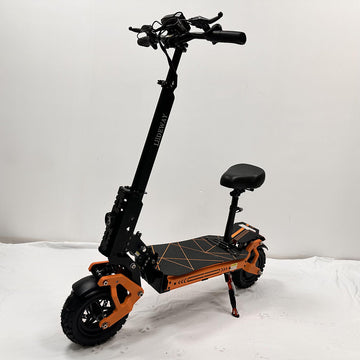
Item No: Liideway1 (single motor)
11inch off road tire and escooter
1. Brakes: front and rear disc brakes
2. Battery: 48V 21AH (21700 cells)
3. Motor: 48V(1800W)
4.support flashlight(2side) and brake light, turn light
5.Distance per charge 50-60KM
6.Max speed:45-60km/h
7. with front/rear shock absorption(reverse C spring shock absorption)
8. Charger: 54V 2A*1pcs
9.Standard: seat/tool set/instruction manual/brake pad
10. Instruments: LCD screen with NFC
11. Controller: 48V 9-tube dual-drive controller
12.frame:Aluminium+Iron
Optional
1.Extra 2A charger:12$(free)
2.Seat+13$ (free)
3.USB mobile phone charging:5$
4.Install 6inch LCD screen+13$(free)
5.with logo(pole and footboard) and carton logo(15us$)
6.upgrade shock absorbers (free)
7.alarm system:8us$
8.Hydraulic brake:30us$
Package
Packing size:137*37*54CM
NW:38KG/GW:45KG
20ft:110pcs
40ft:215pcs
40HQ:250pcs

11inch electric scooter liideway T9:
https://leadwaycn.com/product/11inch-electric-scooter-liideway-t9/
12inch electric scooter liideway T14:
https://leadwaycn.com/product/12inch-electric-scooter-liideway-t14/
14-Inch Electric Scooters liideway T6:
https://leadwaycn.com/product/14-inch-electric-scooters-liideway-t6/
3 wheel scooter electric adult liideway LW3wheel:
https://leadwaycn.com/product/3-wheel-scooter-electric-adult-liideway-lw3wheel/
Adult Electric Scooters liideway T7:
https://leadwaycn.com/product/adult-electric-scooters-liideway-t7/
best electric scooter liideway T5:
https://leadwaycn.com/product/best-electric-scooter-liideway-t5/
electric motor scooter liideway T12:
https://leadwaycn.com/product/electric-motor-scooter-liideway-t12/
electric scooter 200 km liideway T1pro:
https://leadwaycn.com/product/electric-scooter-200-km-liideway-t1pro/
Electric Scooter Bikes liideway T11:
https://leadwaycn.com/product/electric-scooter-bikes-liideway-t11/
electric scooter distributor liideway T4:
https://leadwaycn.com/product/electric-scooter-distributor-liideway-t4/
electric scooter lithium battery liideway T2Plus:
https://leadwaycn.com/product/electric-scooter-lithium-battery-liideway-t2plus/
electric scooter sales liideway T2:
https://leadwaycn.com/product/electric-scooter-sales-liideway-t2/
electric scooters 48v liideway T2pro:
https://leadwaycn.com/product/electric-scooters-48v-liideway-t2pro/
Electric Snow Scooter liideway T13 :
https://leadwaycn.com/product/electric-snow-scooter-liideway-t13/
Europe Electric Scooters Market liideway T10:
https://leadwaycn.com/product/europe-electric-scooters-market-liideway-t10/
Liideway Electric Scooters T8:
https://leadwaycn.com/product/liideway-electric-scooters-t8/
new 2024 electric scooters liideway T1:
https://leadwaycn.com/product/new-2024-electric-scooters-liideway-t1/
Powerful Electric Scooters liideway T15:
https://leadwaycn.com/product/powerful-electric-scooters-liideway-t15/
www.leadwaycn.com
www.prxel.com
www.elctrs.com
www.mdcem.com
www.elxpros.com
www.fame5.com
www.myqex.com
www.scooterelectric.cn
www.liidewayscooter.com
www.bikesscooter.com
Learn how to properly adjust the handlebars on your Liideway electric scooter for a safer and more comfortable ride. This guide covers the importance of handlebar adjustment, essential tools needed, safety precautions, and a step-by-step approach to ensure optimal setup. Regular maintenance and inspection tips are also included to enhance your riding experience and ensure stability on various terrains. Get the most out of your electric scooter with our comprehensive advice!
How to Adjust the Handlebars on Your Liideway Electric Scooter
Understanding Your Electric Scooter's Handlebar Mechanism
The handlebars of an electric scooter are a crucial component, providing the rider with control and comfort while navigating various terrains. On Liideway electric scooters, the handlebar mechanism is designed to accommodate individual preferences through adjustable features. Adjusting the handlebars can significantly impact the overall riding experience, allowing for optimal posture and enhancing maneuverability. Proper handlebar adjustment is essential for both safety and enjoyment during rides.
At the core of the handlebar mechanism are key components such as adjustable points, screws, and mounting brackets. The adjustable points typically allow users to modify both the height and angle of the handlebars. This adaptability ensures that riders of differing heights can find a comfortable setup, which is paramount for effective steering and balance. The types of screws utilized in securing the handlebar also play a vital role in this process. Typically, you will find a mix of hex screws and quick-release mechanisms that facilitate easy adjustments without the need for specialized tools.
Understanding how to manipulate these components can lead to superior handling and increased rider confidence. For instance, the height of the handlebars should align with the waist level of the rider when standing on the footboard, promoting a natural arm position. Additionally, the angle of the handlebars should create a comfortable grip without causing strain on the wrists. A thorough grasp of these adjustments will not only enhance the riding experience but also contribute to safer scooter use. With a well-adjusted handlebar, the rider can maintain better control, ensuring a smoother ride across various conditions.
Tools and Safety Precautions for Handlebar Adjustment
Adjusting the handlebars on your Liideway electric scooter requires a selection of essential tools to ensure a successful and safe modification process. Primarily, you will need Allen wrenches to loosen and tighten the handlebar clamps. These wrenches come in various sizes, so it is prudent to check your scooter’s specifications to ascertain which size is necessary for your model. Additionally, a flathead or Phillips screwdriver may also be needed, depending on the specific types of screws used in your scooter's handlebar assembly.
Another recommended tool is a torque wrench. This tool is crucial as it allows you to apply the correct amount of force when tightening the handlebar bolts. Over-tightening can lead to damage, while under-tightening may result in compromised stability while riding. Following the manufacturer's torque specifications ensures that your handlebars are secured adequately for safe operation.
Safety precautions should always be at the forefront when performing maintenance on your electric scooter. Before beginning the adjustment process, ensure you wear appropriate protective gear such as gloves and safety goggles. This gear safeguards you against potential injuries from sharp edges or slipping tools. Furthermore, place the scooter on a stable and flat surface to prevent any tipping or rolling during the adjustment, which could pose a safety risk.
It is also advisable to perform these adjustments in a well-lit environment to enhance visibility, allowing for accurate tool placement and observation of the adjustment points. Be mindful of the potential risks involved in handling tools and adjusting components. Being cautious and prepared fosters a safer experience as you work on ensuring that your Liideway electric scooter remains in optimal operating condition.
Step-by-Step Guide to Adjusting Your Handlebars
Adjusting the handlebars on your Liideway electric scooter can significantly enhance your comfort and control while riding. Here is a comprehensive step-by-step guide to help you adjust the handlebars effectively.
First, ensure that your Liideway scooter is parked on a flat, stable surface. Before making any adjustments, it is advisable to wear gloves to protect your hands from any sharp edges. To begin the adjustment process, locate the handlebar clamp, which is where the handlebars connect to the scooter frame. You will typically find this clamp secured by one or more screws. Using an appropriate Allen wrench or screwdriver, gently loosen the screws. Make sure not to remove them entirely; they should remain attached to the clamp for easier reassembly.
Once the screws are loosened, you may adjust the handlebar height. To do this, lift or lower the handlebars to your desired position. Consider the ergonomics of your body; the handlebars should be at a comfortable height for your hands and arms. If necessary, tilt the handlebars at the desired angle to find a natural grip. For a proper fit, it is also advisable to step back and assess the alignment of the handlebars with the front wheel. Proper alignment ensures balanced handling and stability while riding.
After you have set the desired height and angle of the handlebars, carefully re-tighten the screws in the clamp. Utilize a torque wrench if available to ensure they are secured correctly without stripping. A good practice is to alternate tightening each screw to achieve an even clamp around the handlebars. Once secure, perform a final check on the handlebar angle and height before taking a test ride. Adjustments to the handlebars can make a significant difference in your riding experience, offering better control and comfort. Always consult the user manual for additional guidance and specifications related to your specific Liideway model.
Final Checks and Maintenance Tips After Adjustment
Once you have adjusted the handlebars on your Liideway electric scooter, performing a series of final checks is crucial to ensure both safety and comfort during your rides. First and foremost, verify the tightness of the screws that hold the handlebars in place. Loose or improperly secured screws can lead to instability, making your riding experience unsafe. Use the appropriate tool to tighten them and double-check that they are fastened securely.
Next, assess the overall stability of the handlebars. Stand next to the scooter and gently wiggle the handlebars to see if there is any movement. They should be firmly positioned without any play or wobbling. If you notice any instability, it may indicate that further adjustments are needed. Additionally, check the alignment of the handlebars; they should be parallel to the front wheel and positioned comfortably to allow for ease of control.
Moreover, as part of your maintenance routine, regularly inspect the handlebars and other components of your electric scooter. Look for signs of wear, such as frayed cables or rust on screws, which could compromise safety. Keeping your scooter clean and free of debris can also prevent unnecessary wear. Performing regular visual inspections on a weekly basis can help identify any potential issues before they escalate.
Should you encounter persistent issues or uncertainties regarding the handlebars after your adjustments, do not hesitate to seek professional assistance. A qualified technician can provide expert insights and tackle any technical challenges you might face. By adhering to these checks and maintenance tips, you can enhance the longevity of your scooter and enjoy a safer, more comfortable riding experience.
Related Articles


